LED Flat Flashlight
Materials:
- 5 mm or 10 mm white diffused LED light (We got ours from Evil mad Scientist, which unfortunately they are no longer selling. Other suppliers All Electronics, Goldmine Electronics, or Amazon)
- 3V lithium coin battery (we got ours from sciplus.com item # 40919)
- copper tape (found in the gardening section of hardware stores as an anti snail/ slug product or alternatively in 1/4'' form on Amazon)
- electrical vinyl tape
- jumbo craft stick
Tools:
Scissors
Ruler (optional)
Cut copper tape long enough to go down the length of the craft stick and to wrap about 1/2'' to the other side.
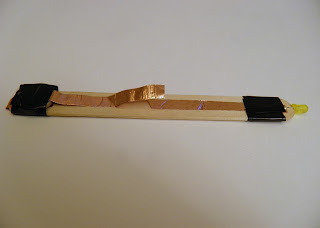
Place your coin battery on to the short piece of copper tape you wrapped over the end of the stick with the positive side of the battery facing up, negative side down touching the copper tape. Take a shorter piece of copper tape and fold each end over about .75'' each side, leaving the middle section with adhesive, and adhere it to the craft stick making sure one end of the tape is over the coin battery. The copper tape we used, glue is not conductive so you have to fold over tape to allow the electricity to flow. In the image above, the right side of the top copper tape is the positive battery contact and the left side is the switch contact.
Place LED light on the end of the craft stick, with the long positive lead of the LED on the switch side of the flashlight. Above image shows the flashlight with the switch open and the LED in place. Test the flashlight be pressing LED leads against copper tapes and complete the circuit by connecting copper tape switch onto copper tape connected to the LED. If it works, secure LED light leads onto craft stick with electrical tape. If it does not work try switching the position of the LED leads.
Here the switch is closed and the light on. Note that for this example we ended up using a yellow led we had laying around not the recommended bright white led.
The final flashlight with the battery and LED taped in place.
This is a slightly modified version using an ultra bright white LED and a cup with wax paper as a diffuser. Adding the cup and diffuser spreads out the light and makes shining it it in someone eyes less hazardous. This version also uses aluminum tape for the circuit connectors and switch.
Here's a video of the flashlight working during the day and in the dark:


