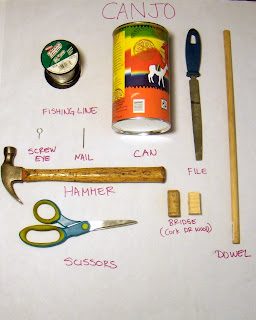
Canjo
Materials:
•1/2'' dowel (about 2' long)
• coffee can (we like the kind with steal bottoms and cardboard sides as its easier to put holes in them)
• 50lb test fishing line
• small eye screw
• a finishing nail
• a cork or a small piece of wood
Tools:
• scissors
• hammer
• a file or a small saw
To start the instrument carefully use a nail to mark the position for the dowel hole, making sure that its low enough that the dowel will not touch the surface of the can when inserted. When you're satisfied with the positioning of the holes use a pair of scissors to widen them out so they are just smaller than your dowel.
In the past when we were making these with large groups we would pre-prepare the cans to this step, as there is tremendous learning potential in these steps and mistakes here can hinder the function of the instrument later.
Hammer one nail into the dowel about 1/2'' from the end and use another nail to make a pilot holes about 1/2'' to an inch from the other end of your dowels making sure that they both face up. Its a good idea to bend your nail toward the end of the dowel (unlike the picture) to prevent the string from flipping off and from making a hazardous spike. Note that you can do this part before or after you add the can to your dowel, hammering with the can on the dowel can be awkward but chances are it won't hurt the instrument.
Take the eye screw and screw it in 3 or 4 turns into the pilot hole. Note that the dowel must be in the can at this point as you won't be able to get it afterward.
Tie your fishing line around the nail and bottom of the dowel to secure it. Again make sure to bend the nail down. Make sure the eye screw is mostly unscrewed and tie the fishing line onto it. Then screw it in to tighten the line by twisting it around the shaft of the screw.
Once the the line is taut you can play the canjo but it will produce only a soft dull sound. To rectify this we need to transfer the energy of the vibrating string, which has very little capacity to move the air around it, to the head of the can with its much larger surface area thus air moving capacity. To do this we need to make a bridge, a small piece of wood or cork with a groove filed into it for the string to rest in. This can be achieved with the corner of a flat file or a small saw.
The end result being something like this,
or this (which can be done with a utility knife)
To finish add the bridge between string and the top of the can.
After the canjo is assembled lots of experiments can be done to figure out how to change the tone (frequency of the sound), timbre (the character of the sound) and volume. Tightening and loosening the string or fingering like a guitar are some ways to change the tone, tighter and shorter makes high notes and looser and longer makes low notes. Moving the bridge, closing the can and adding holes, cutting the can off, or adding other items to the can are ways to change the timbre of the sound and the volume. You can add frets by wrapping wire around the dowel at specifics lengths. This will allow one to play written music, skill and patience pending, we've actually had several kids figure out how to play base lines of songs them knew on a canjo. Being so simple there are a lot of ways to experiment with it to significantly change the sound it produces. That said the form seen above is really a starting point, figuring out how to play it and change the sound it makes is the real value in this project.
Here's the canjo in action:


